|
|||||||||||
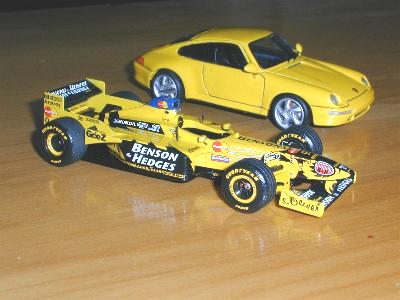
When you build a model, how do you decide on the subject? I know some people build just one make (I started out with only Ferraris), others build cars from just one race - le Mans for example. Some build racecars using a certain livery - Martini and Jagermeister are two that spring to mind. Formula One, British cars, German cars, American cars, pre-war cars - the list of possible themes is endless with the variety of kits now available in 1/43 scale. I'm afraid I've become a "random builder", although like many, perhaps a "random buyer" would be a more accurate description. My build ratio is not great compared to the number of kits I have purchased, although my 1/43 ratio is substantially better than that of my larger scale plastic kits. This is purely a function of time however, as I am very new to the world of 1/43. So far, all the 1/43 kits I have built have been yellow. Strange theme? Well no, coincidence really. My first effort was a Tameo F1 kit - the Jordan 198 from the Melbourne Grand Prix. This was the first F1 race I had attended so the choice of topic wasn't difficult. My second 1/43 attempt is the subject of this report. The Porsche 911
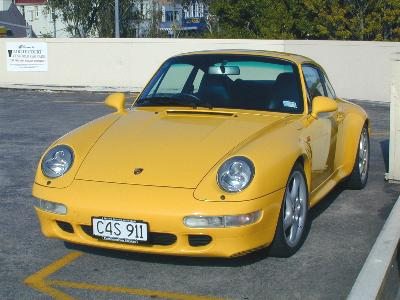
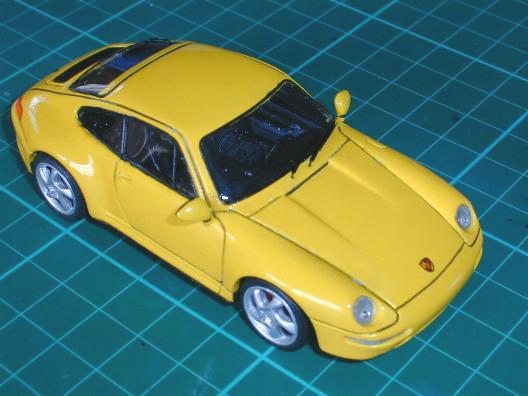
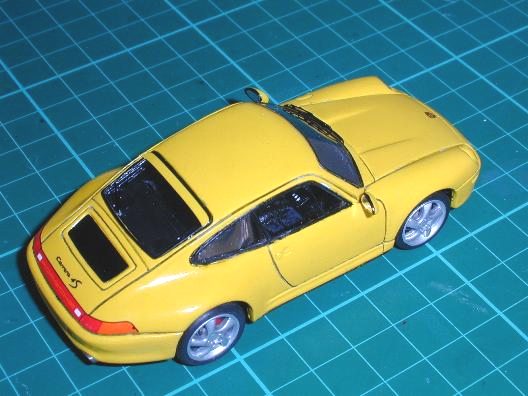
I am fortunate enough to own a 1:1 version of this beautiful car, hence my choosing of the subject. My car is a custom option colour - Ferrari Daytona Yellow, so the yellow theme started by the Jordan continues. The kit
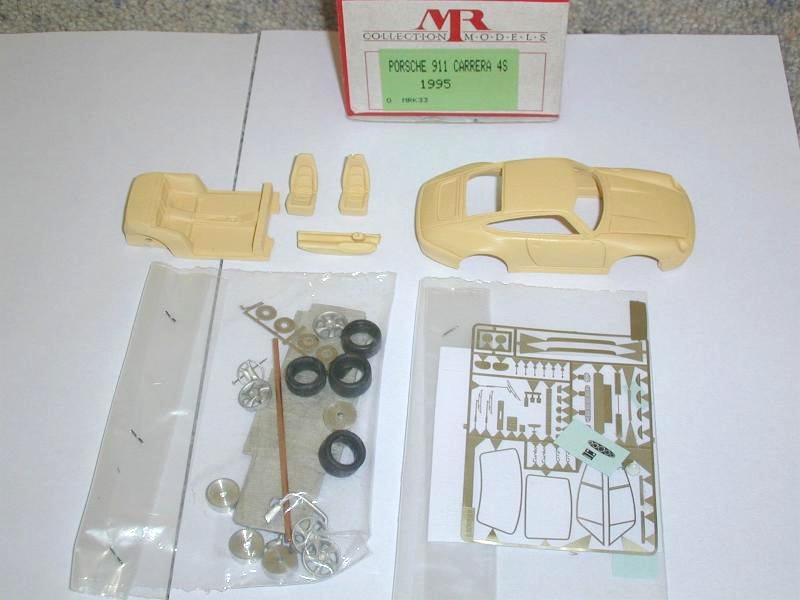
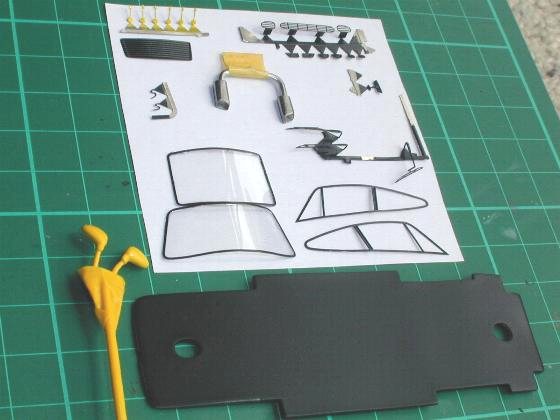
The inside of the body is quite roughly shaped, but not really visible once the model is completed. The PE sheet includes window frames, grilles, windscreen wipers etc. Several parts are not used as the frets are also used for other Porsche kits. A small decal sheet is provided for the dashboard, rear lights and Pirelli tire markings. The instruction sheet is of the "exploded drawing" type and is quite adequate for this relatively simple kit. Constructing I began my preparation with the resin parts, filling any blemishes and removing what little "flash" was present. The body was lightly sanded and washed, then primed using Bodytech Spray Etch Primer which I purchased from my local K-Mart. The photoetch frets were also sanded and primed using the same spray can. With the white metal parts, I rubbed them with a fine brass shoe brush to remove any oxidation and primed them with Gunze Mr Metal primer. This is a clear primer with a satin type finish. The wheels were a little too shiny with just the primer, so they were sprayed with Tamiya TS17 Gloss Aluminium, which perfectly matched the wheels on my real car. I left the exhausts in natural metal. All the PE parts were sprayed a semi gloss black except for the door handles and rear windscreen spoiler, which were painted to match the body colour. The brake discs were left unpainted, and the callipers were hand painted red. I gave the body several coats of a yellow that I purchased from an Autoparts shop. I can't recall the actual colour, but it is reasonably close to that of my 1:1 car. After allowing the body to dry thoroughly, I polished it using Auri car polish. This is a low abrasive polymer type polish and resulted in a finish I was very happy with.
The use of actual car type paints is new to me and I picked up a few lessons from the experience. Firstly, it is great to have a paint that hardens up quickly and is impervious to the type of fingerprints you often get in model type paints. It will withstand a lot of polishing without the risk of going through the topcoat. A problem I did encounter was caused by the hardness of the paint - it chips easily. I learned this to my detriment when using a hobby knife to remove excess polish from the panel lines. In future I will use something softer like a toothpick (cocktail stick).
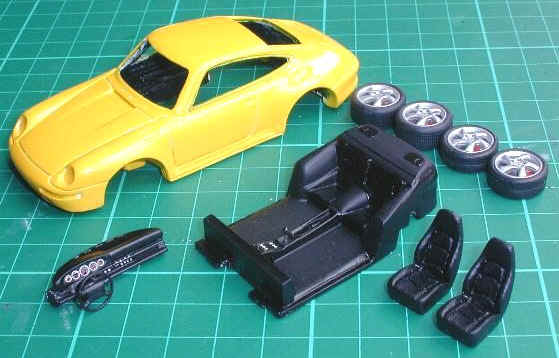
I wanted the interior of the car to be black, but the main problem with this is that it conceals a lot of the detail. To try and overcome this, I used several different shades of black, and a small amount of drybrushing using a dark grey. A lot of the detail is still hidden, but it is better than it could have been. There are several small PE parts to be fitted to the interior including door handles and speaker grilles. The dash panel is resin and the steering wheel white metal. All went together without any problems using small amounts of CA glue. A metal dressmaking pin is provided for the gearlever, which I trimmed to an appropriate size. Detail painting of the switches and other small parts was carried out by hand with a fine brush, and using a "metal ink" pen. These are available in a stationery shop and come in silver, gold, copper and white. I find them very useful, although they take a long time to dry.
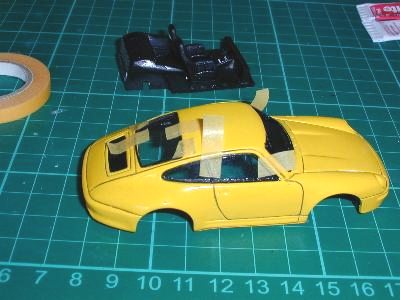
With the interior complete, it was time to move back to the body. Firstly I highlighted the panel lines with a thin wash of black acrylic flowed into the lines using capillary action. Some say black is too harsh to use on a small model and grey or a darker shade of the body colour is better, but for this kit I wanted the lines to stand out as they do on the real car. Windows Next came the part that I was dreading - the windows. I studied the recommended method in the Amazing 43 "How to" pages (How to fit Photo etched windows), and took the plunge. I started by applying a small amount of 2-part epoxy (Araldite) to the PE window frames using a toothpick. I put these onto the sheet of acetate and placed them between two wooden coasters in a vice overnight. In the morning, I found the front and rear windscreens were fine, but the side windows had suffered from excess glue seepage. I decided to trim them up and see how they looked, and then decide whether or not to redo them. I cut around the window frames with a small pair of scissors, then trimmed any excess acetate using an Exacto knife.
The side windows didn't look much better, so I removed the PE frames, and reglued them. This time I was more careful with the glue, and I got a much better result. Before attaching the windscreen to the car, I curved it slightly by rolling it around an Exacto handle. Using a small amount of epoxy, I stuck the front and rear windscreens in place, and secured them with strips of Tamiya tape. The side windows were a bit more difficult as they were recessed into the body and it was hard to get the right type of pressure on the tape. Once the tape was removed, again the front and rear windscreens were fine, but there was some smudging and areas that hadn't stuck properly on the side windows. By now I was getting sick and tired of the whole process. I had to remove the side windows, reattach the PE to yet more acetate, and try again. This time I tried using a contact adhesive so I could remove any excess more easily, but it didn't stick as well as I had hoped and reacted with the paint on the frames. Back to the old Araldite again. I finally got the side windows attached, but I'm still not 100% happy with them. This was by far the most frustrating part of building the model, and what really annoyed me was that I was expecting the curved windscreen to be the difficult bit, and the relatively flat side windows easier. In fact it turned out the opposite. It was certainly a learning experience, and I'll be wiser the next time (or maybe I'll stick to F1 models with no windows!) Finishing All that remained now was final assembly and the adding of the smaller PE exterior details. I drilled holes for the exterior mirrors and attached them with CA. I had drilled the holes for the windscreen wipers prior to painting the body and these just required clearing out before gluing the wipers in place. Due to the close proximity of the windscreen I used white glue to eliminate the risk of fogging. The oil and brake cooling duct grilles were added along with the body coloured doorhandles. The headlight recesses were hand painted silver and the bulbs and lenses glued into place again with white glue. The full width rear lights in this kit are represented by a decal, but unfortunately it is not shaped correctly for the contour of the body. When applied, it results in a gap between the bottom centre of the decal and the bumper. Another minor drama occurred when I attached the PE rear license plate using CA and put it on crooked. When I removed it, I also removed a large part of the paint beneath. This involved some tricky covering up but the end result looks ok. The wheels are mounted on simple metal axles and I used Bluetack to attach the axles to the body so I could easily adjust the ride height. To finish off, the metal base plate was screwed into place.
Summing up... I learned a lot from building this model, and whilst I am reasonably pleased with the result, I'm sure I can do better next time. My thanks to John Lancaster at Grand Prix Miniatures Australia for tracking down a C4S kit for me and for his advice and encouragement. Now, on to my next project. I'm not sure what it will be yet, but I know for sure that it won't be yellow!
|