|
||||||||
|
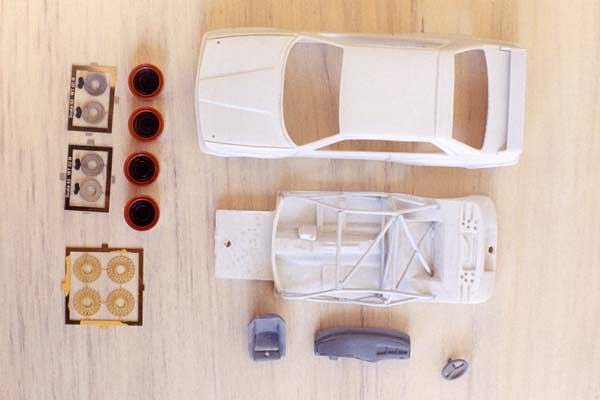
The model is made by Competition 43. The kit consists of resin body
and chassis. White metal is used for the mirrors, roll cage, dash
panel, steering wheel, seat and fire extinguisher. There are a number
The parts themselves are of high quality, except for the resin casting for the body on my kit. Most of it was fine, but a corner of the rear bodywork behind the left rear wheel opening was missing. It wasn't broken. It looks more like a bad casting. All other pieces were cast very well, with little flash to clean. The photoetched parts are excellent, and the decals are very nice.
Prep for painting
The body was easy to prepare. Only the rear wing and door handles
needed to be attached. The chassis took a little longer since the
roll cage was constructed at this point. Since the interior is all
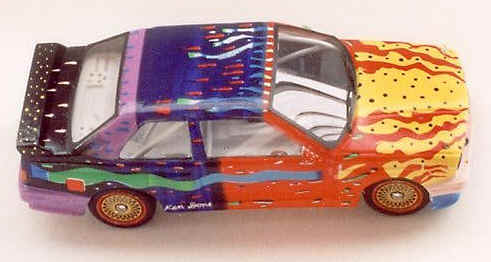
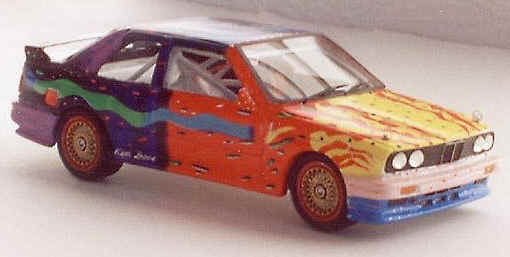
But maybe not. If you look at the photos, you will notice that the B pillar is painted along with the rest of the body. There is no B pillar as part of the casting. I have not seen a photo of this model finished, but I didn't feel comfortable placing decals on the black frames later. I'm not sure exactly how Competition 43 would handle this. As you can see by the photos, I didn't add a B pillar before painting. But just as I was about to start placing decals, I made and attached my own B pillar. It was quickly painted and attached to the body to be decaled with the rest of the body. My only worry about doing it this way was how would the glass look butting up against the pillar. There could be gaps. In retrospect, I would build more of an area for it to sit on, instead of just butting up against it.
The self-adhesive window frames can still be added, but that isn't really correct since the glass goes up against the painted areas. But I'm getting ahead of myself now. My recommendation is to add a B pillar before painting. You could use aluminum sheet or plastic sheet. Don't forget to add some curvature to it. The piece I made is done in layers. Make a sheet to fit even with the inset area for the glass, then another layer in 2 pieces leaving a crack between to represent the door opening.
Painting When painting a car that gets completely covered in decals, I worry mostly about a smooth even coverage of paint. It doesn't really need to be perfect. It won't be seen at all when finished. This is one kit where it might be more important to get the inside painted better than the outside. The sheet of plastic used for the glass is quite clear. With this, I painted 2 coats of white primer and a couple coats of white paint. The steering wheel, seat and dash were sprayed black. The Decals I always start with the roof. There really isn't much wiggle room with it, so you can't really go wrong here. Then I did the back area working my way down around the bumpers. This part is a little tricky with the depth of the grooves. The decals work well with Micro Sol to help get around the details in the body. There is not a lot of overlap from one decal to the next, either. But getting everything in place is not too difficult. I tend to want to do the side last to avoid handling them. A couple of decals are difficult to understand their placement. The smaller funny tear-drop shaped decals that don't look like they go anywhere, are for the mirrors.
There is a white strip with red dots on it that goes below the front grill above the bumper. There is a purple strip with white on it that I still haven't figured out it's placement. Under the rear bumper? I'm not sure. I did need to touch up with some black around the back area and the wing. The purple around the rear bumper also needed some areas filled in. This purple was difficult for me to match. Other than that, the decals covered the rest.
Assembly After clear coating the body, I started placing some of the photoetched parts. I didn't want to get too far before I attached the glass. I took my time and attached the front and back one evening, then the side windows another day. I just like to leave the glue time to sit before handling again. Using the black window frames for reference made cutting the parts go easily. But I did cut out side windows a couple of times to get the fit as good as possible.
Like some of the decals, it also took me a little deciding what some of the photoetched is for. The funny looking pieces with the grid on them are the taillights. Paint these with translucent paints. Some of the rectangles attach to the front bumper and spoiler area. The grill goes behind the air inlets in the front spoiler. There are body hooks and fasteners to attach also. The wheels are easy to make. The rims get painted red, the photoetched yellow, the brakes and calipers get various shades of metal. The caliper just bends over on top of the disk. Those get assembled with a wheel nut being the finishing touch. They look just right.
The interior doesn't require much more to do after painting. Just add fire extinguisher and seat. Belt material is provided as well as seat belt photoetched hardware. The instrument panel was attached to the roll cage and the chassis was joined to the body. Finally, the most delicate pieces get attached to the body. Hood pins, windshield wipers and the emergency pins are the last things I do. Conclusion
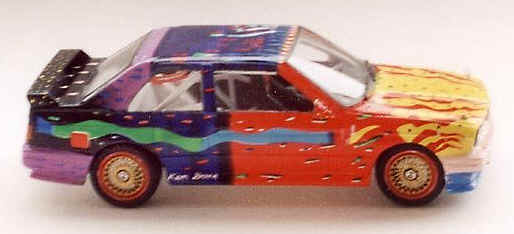
I don't think any other kit that I have built has been noticed by the
family more than this one. The colors of the decals are quite
brilliant and really catch the attention of people passing by. The
kit has some nice detail. But other than the 5 photos and brief
painting guide, the instructions are not very detailed. It really
isn't a problem finding out where most of the parts go. I'm just left
guessing whether I used all of the photoetched parts I should have
used. I think the only thing really lacking on the model itself, are
|