|
||||||||||
|
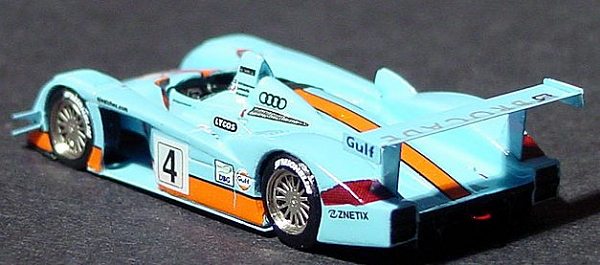
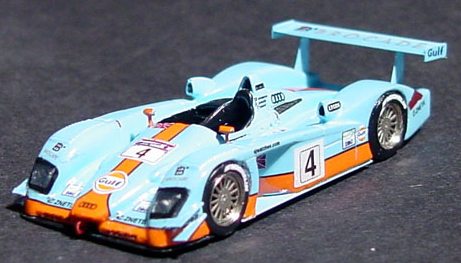
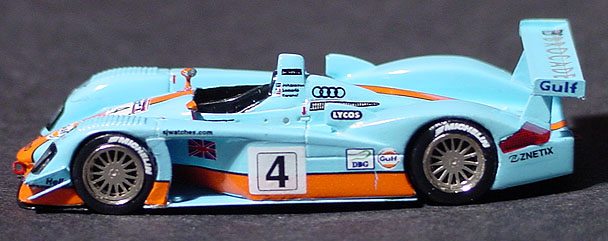
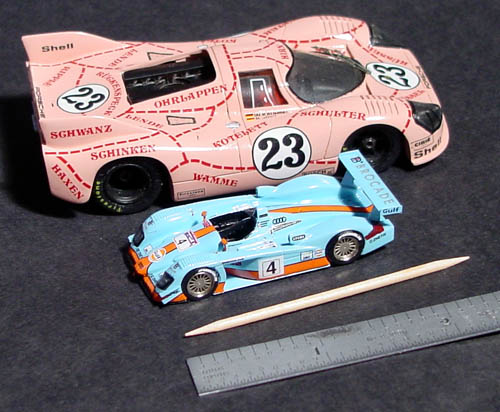
I always liked the look of Stefan Johansson's Gulf sponsored Audi R8, so when I saw that Le Mans Miniatures had released a kit of it in 1/87 scale, I thought it would be a good choice to see what one of these little kits was like. In a word, "tiny". Everything is tiny, but not horrifyingly so. The biggest part is the body, which is a whole 2 inches long. The smallest is the front tow hook. Yes, the kit included 1/87 scale tow hooks.
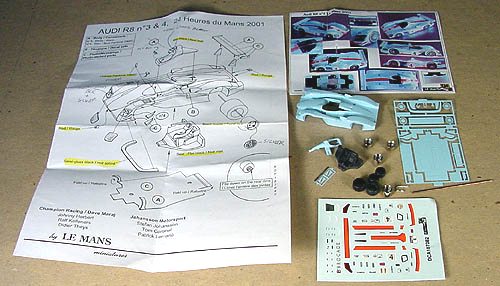
The kit It can be purchased either painted or unpainted. I bought a painted kit just to see what they were like. This story will soon become a tale of two kits, but I'm getting ahead of myself. First, the complete list of parts.
Building the small Audi The body, cockpit surround, and all photoetch comes painted in the proper Gulf powder blue. The paint finish was near perfect. The only cleanup to the painted resin parts was to remove a sprue and a little flash from the cockpit surround. Almost all the flash was in areas that were to be painted black, so cleanup did not damage the paint. The black resin interior also had to have a sprue cut off it.
The photoetched wheel inserts should be natural metal not blue, so you will have to strip the paint off them. I also stripped the paint off of any parts that would be painted a different color. Remove the rear wing from the large fret and then cut the fret in two so that the wheel inserts, steering wheel, splitter, and tow hooks are on one piece to be stripped and the chassis plate, wing supports, and endplates are on another. Polly S Easy-Lift-Off (my favorite paint stripper) would not remove the paint so I had to use lacquer thinner.
Next I detail painted the body. This consists mostly of painting matt black in the appropriate areas. In addition, I didn't like the carbon fiber decal that came with the kit -- the fiber weave of the decal is too big for the scale. Instead I painted that area of the car in gunmetal, which I think simulates the CF on the surround fairly well. Use the photos enclosed in the kit and any reference photos you have to tell you what to paint where. The 2001 Le Mans edition of Automodelisme was quite handy. In addition to the black, the headlights should be painted silver. I painted the interior semi-gloss black and the seat flat black for contrast.
In this scale you should be care with CA... Next step is to glue the cockpit surround to the body prior to decaling. The surround had a slight warp to it, so I had to hold it down until the glue set. My fingers were used to clamp the parts together. I thought I had used my CA glue sparingly, but apparently not. I glued my finger to the body. Uh-oh. I pulled my finger off and took a chunk of paint with it. Hmm, no primer underneath (not that that would have helped).
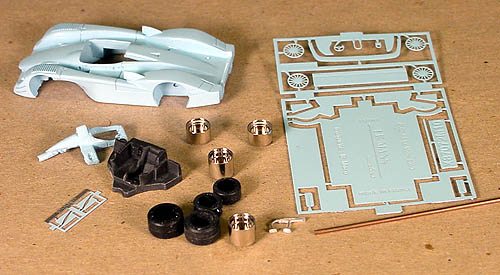
Don't panic. Strip the paint and repaint it myself. Have to use lacquer thinner, though, so we're playing with fire. Into a small jar of thinner. After 15 minutes, the body looked fine but only about 1/3 of the paint would come off. Back into the thinner for another 10 minutes and... a rear fender broke off when I picked it up and all the resin is mushy. OK, now I can panic. The help arrives from Texas... Richard Shouse of RCS Motorsports of Texas, who is a friend of mine, took pity on me and gave me a new, unpainted, kit. He wanted to see one built even more than I. Thank you, Richard. The unpainted kit is the same as the painted one except that, well, nothing is painted. First thing to do with the new kit is clean up the two beige resin parts (the body and cockpit surround). The surround clean up was the same as before with the addition of having to fill a pinhole and glue the rear tip of the roll hoop (which had broken off because of another pin hole) back on. Flash needed to be removed from the cockpit opening and wheel wells. The toughest thing to do is remove the mold line inside the front wheel wells. The space to work in is not very big. Be careful to not damage the surrounding areas. Who ever cleaned up the painted kit did a wonderful job.
The new cockpit surround also had a slight warp to it, but this time I didn't glue myself to the model when installing it. Now its time to paint the body, wings, etc. that need to be painted powder blue. I could not find a paint close, so I had to mix my own. I thought airbrushing a mixture of 67% Gunze Sangyo H323 Light Blue and 33% Gunze Sangyo H1 White would do the trick but after drying it was too dark. It still looks good but I have to make sure I don't place it next to anything painted the proper Gulf powder blue.
After the blue was dry, all the black and silver portions were hand painted. Also at this time, the splitter and steering wheel were painted semi-gloss black and the tow hooks painted red. Decaling Now it was time to decal the body. Four things I noticed about the decals right off the bat. One, they are all a little too large according to the photos in Automodelisme. Two, the whites are not very opaque. Three, there is no orange stripe for the side of the cockpit surround. And four, the sheet of decals from the first kit were slightly misregistered, but the decals from the second were fine. All the decals went on quite well except for those on the nose. It took a bit of Gunze Sangyo Mr. Mark Softer to get the center stripe to conform to the nose. I also cut the "hooks" off the front stripe decals as they would not have fit right. Gunze Sangyo H14 Orange is a perfect match for the stripes and was used to touch up the stripe decals. I also brush painted it onto the cockpit surround where there was no decal. The black pin stripe that runs along the orange there was cut from the extra decal sheet I had.
Another problem with the decals is the amount of clear film around each one. In this scale it can become a big problem when a decal is placed near an edge. You will want to trim several of the decals right at the printing when cutting them out of the sheet. Make sure you have good reference photos when applying the decals. The pictures supplied are much too small to see all the decals. The photos are also of a larger scale Audi kit, not the one you are building, so it will look a little different. There are several small red arrows supplied that indicate the location of body clips and I had to look closely at the Automodelisme photos to see them. There is a decal for the dashboard and there are also decals for the shoulder harness manufacturer logo patchs! I painted the seat and shoulder belts with red paint using a 10/0 brush.
The chassis After all the decals on the body and interior were dry, I placed the interior in position and attached the chassis plate. Be very careful cutting the plate from its fret. The flat fender sections that stand vertically behind the front wheels are part of the chassis plate and are to be folded up to the body. Both of those pieces snapped off the chassis as I cut them from the fret. The fold line is very thin. Also, the interior needed to be filed on the bottom so that the chassis plate would fit flush to the body. The chassis has two holes in it and the body has two holes in the bottom to match them, but there are no screws supplied in the kit. I had none that would work (they would need to have very thin heads) so I glued the chassis to the body and then used CA glue to attach the snapped off vender sections to the chassis and body. After the glue had set, I applied the orange stripe decals to the fender pieces. Next, I attached the headlight covers. There are two clear vac-formed parts in the kit. Each has both right and left headlight covers on it. Look real close, they're there. Its nice LMM includes spares. Cut them out and glue in place with Micro Crystal Clear or white glue thinned with water. After the glue is dry, apply the headlight edge decals. After all of this was dry, I brushed a clearcoat of Future Floor Wax onto the body work and headlight covers using a Microbrush.
After the Future had dried, I attached all the tiny photoetch parts. They are really not smaller than what a lot of larger scale detail sets have. They just represent larger pieces of the real car. One problem is that after trimming them from their fret, there is not much to hold on to while filing the cut edge smooth. The parts added now were the steering wheel, dive planes, and tow hooks. The hole in the center of the steering wheel is too small, so I opened it up some with a #76 drill. Attaching the dive planes to the front fenders was probably the single hardest part of assembling the kit. There are shallow slits in the fenders to indicate their placement, but they are hard to see after painting and decaling.
Wheels Time to assemble and install the wheels and tires. First you have to file down the backs of the rear wheels. Then the wheel inserts were simply pushed into the wheels. They stay in place rather well with no glue, which is good because I was afraid that any glue I used would ooze around and fill in the wheel spokes. To attach the wheels to the axles, I stuck the tip of the axle into a puddle of CA glue and then gently inserted the axle into the back of the wheel until it touched the wheel inserts. In this way I actually did glue the inserts in place.
After I had one wheel on each axle, I stuck the axles through the body, trimmed them to length, and glued the opposite wheels in place. Then I tried to put the tires on the wheels. The fit of the rear tires is tight inside the wheel wells. With the help of a toothpick, I managed to get the tires on. The fronts were harder. The tire has to really stretch over the wheels. I tried stretching them out by pushing them own over the cone-shaped cap on a glue bottle. In the end, I got them on but knocked off one of the photoetched fender pieces and two dive planes in the process. Reattachment of these parts was not a problem. If I were do it again, I would assemble the axles/wheels/tires and install them when I attach the chassis plate.
Decals were applied to the tires by first brushing the sidewalls with Gunze Sangyo H30 Gloss Clear. After that dried, I applied the decals and covered them in decal softener. (Don't forget to trim off the excess decal film.) After the decals were dry, I brushed Gunze Sangyo H20 Flat Clear on the sidewalls. There are decals that I believe go on the wheel centers, but the first one I tried to use folded itself over and refused to be properly applied, so I didn't bother putting any of them on. Probably the only decals that could have used some extra decal film. Before assembling the rear wing it needs to be bent slightly. There is a line in it that indicates where. Unfortunately it is too far to the rear of the wing to be prototypically correct. Glue the endplates to the wing, decal the wing, glue the wing supports to the body, and finally the wing assembly to the supports.
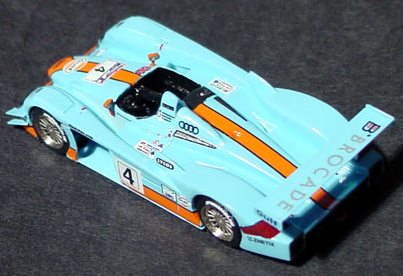
Conclusion The final parts to install are the mirrors, which should first be painted orange. Voila! Despite the problems mentioned, this kit builds into a beautiful little jewel. And it's not that hard to build, even with my big fingers and bad eyes. (Make sure you own an Optivisor. Its a must have when working in this small scale.) I'm looking forward to building the Le Mans Miniatures Ferrari 312PB LM in this scale.
|