|
|||||||||||||||
|
2002 marked the 37th year of the Sports Car Club of America's Trans-American (Trans-Am for short) racing series. Tube-framed silhouette racers from Jaguar, Panoz, Ford, Chevrolet, and Dodge battled for the championship. While these cars were full race cars, the Trans-Am started all those years ago as a series for basically stock sports coupes such as Ford Mustangs, Chevy Camaros, and Dodge Darts (plus an under-2-liter class with Alfas and Porsches).
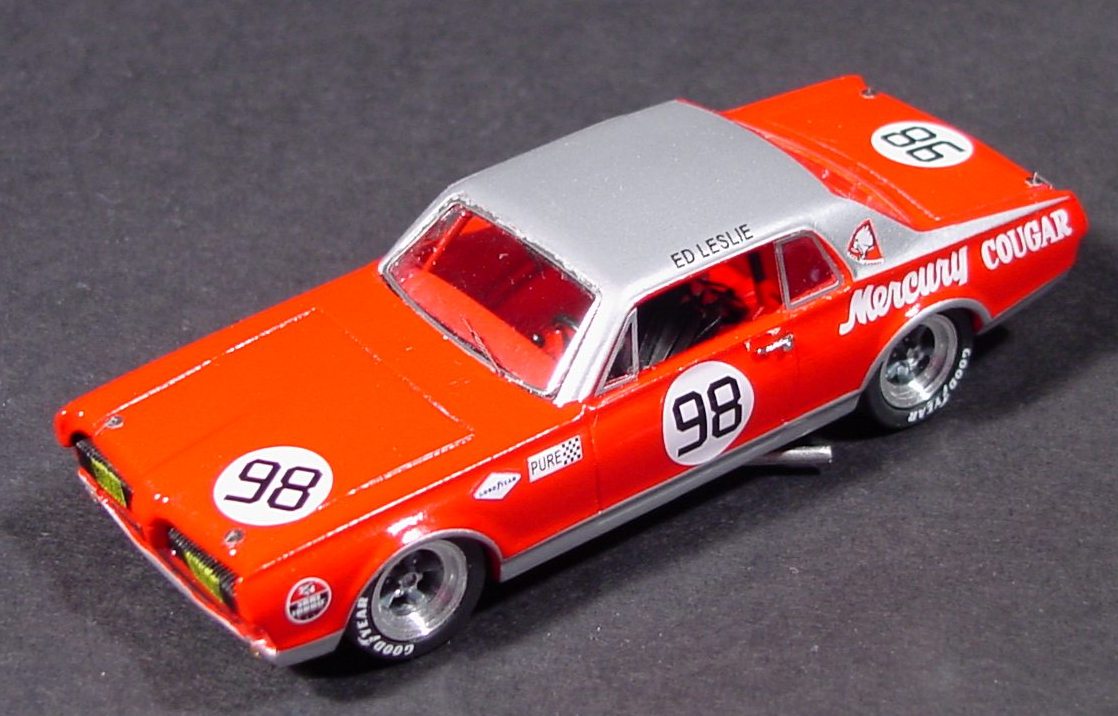
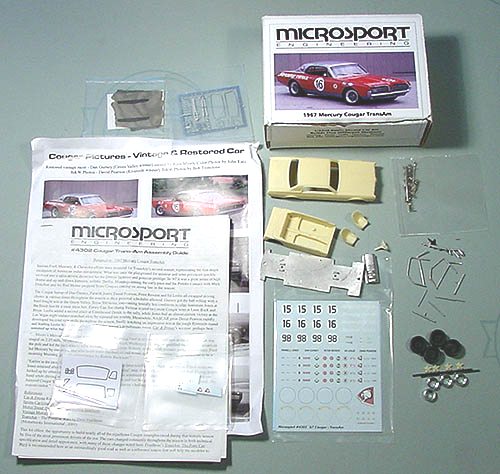
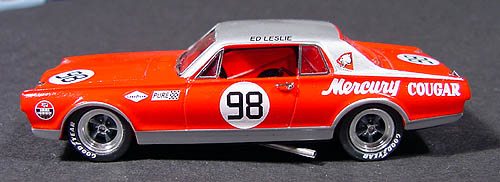
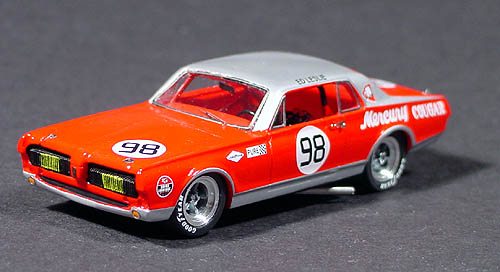
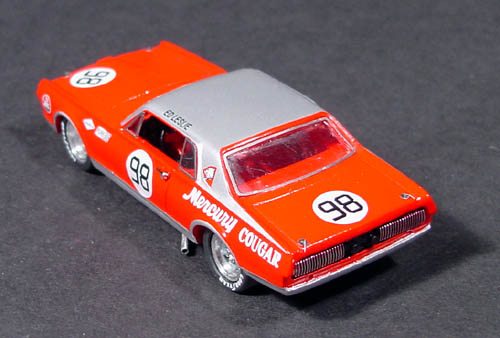
In 1967, the series' second season, the Ford Motor Company's Mercury Division entered a team of Bud Moore prepared Cougars to do battle with Carol Shelby's Mustangs and Roger Penske's Camaros. Main drivers for the team were Dan Gurney and Parnelli Jones with Peter Revson, David Pearson, and Ed Leslie also driving at times. The team won several races but finished second in the championship to Shelby's Mustangs. After the season, the team was disbanded as Ford decided not have their two divisions fight against each other in the series. Kits of the early Trans-Am cars have been few and far between, as have kits of early Cougars. I was very excited when I heard that decal manufacturer Microsport Engineering was about to produce a kit of the 1967 Bud Moore Cougars. This is Microsport's first kit. Richard Shouse at RCS Motorsport Models of Texas helped get me one of the first kits produced for revue. First Impressions
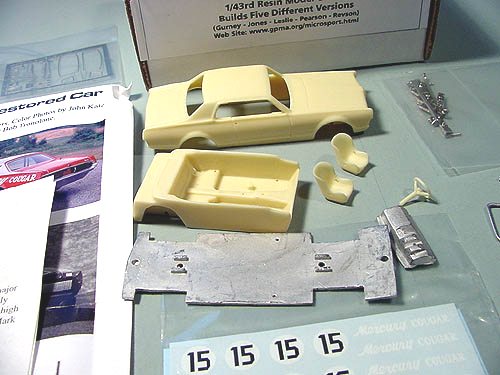
The kit can be built into one of five different cars: Gurney's Green Valley winner, Jones' Green Valley car, Revson's Lime Rock winner, Pearson's Riverside winner, or Leslies's Lime Rock car. I suspect with proper references, any other version from the 1967 season could also be built. Preparation
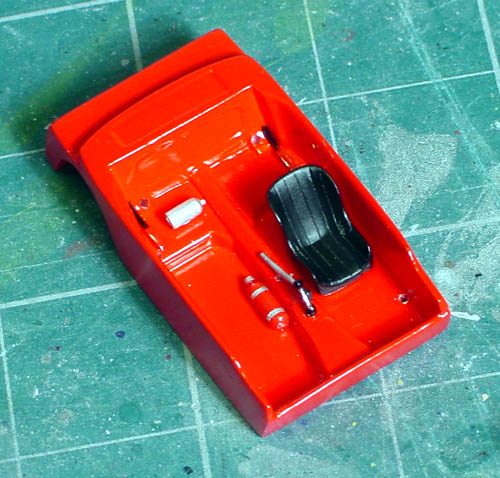
Body cleanup was easy as there was almost no flash -- just a bit along the window edges. There were also a few "plugs" on the bottom edge of the body and inside the roof that were easily removed with a file. Since I was building Leslie's bumperless late season car, there were two extra things to do. First was to file back the car's front fenders. (See page 50 of Dave Friedman's book Trans-Am, the Pony Car Wars 1966-1972.) The other was to remove the lug for the passenger seat from the floor of the interior, as the late season cars had it removed. It cut the lug off with Xuron clippers and then sanded the area flat with a curved file.
There was also a bit of flash to remove from the chassis plate and the small cast pieces. The resin wheels did require quite a bit of cleanup. The Build To build the model, follow the directions -- almost everything is there. Although the included photo sheet is sufficient, having the Friedman book is a plus. The tires are made of resin and each has a lug to be removed. If you've ever built a Marsh kit, you know what I'm talking about. The lug removal is not a problem with the front tires as they're on the back side of the tires, but its on the tread of the rears. Be careful not to flat spot the tires when sanded it smooth. Make sure that your resin wheel spokes fit inside the metal rims before attempting to glue them in place. I had to sand down part of the spoke tips and then press them into the wheels (with rims already in place) using a plastic tube that fit inside the rims or they wouldn't lay flat. I painted the spokes with Tamiya TS-32 Haze Gray spray paint. After priming the body and interior, I opened up the holes in the body for the door handles (not deep enough) and in the interior for the roll cage (not large enough).
There are four minor and easily correctable errors that Microsport owns up to but which are not mentioned in the instructions:
1) There is no fire extinguisher in the kit. They could find no picture of one used on the Cougars or exactly where it was placed, so they left it out. They recommend adding one from your scrap box on the passenger side up against the tunnel, which is what I did.
2) The seat and shoulder harness included in the kit is of the modern set in the restored car. Again, no photos could be found of the vintage harness.
3) They recommend thinning the inside edges of the fenders a bit to allow the car to be lowered as much as possible. I chose not to do this so I could see how it looked straight out of the box. The stance of the finished model looks fine to me. Any lower and the exhausts might drag on the ground.
4) They recommend drilling out the exhaust tips or replacing them with a piece of tubing. Again, the stock parts look fine to me with a little flat black paint in the end of them.
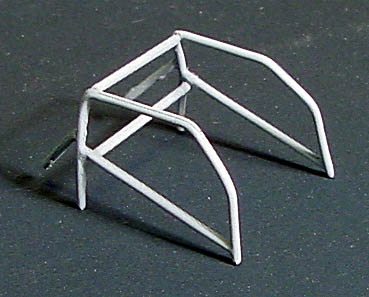
Between the written instructions and the kit photos, all the cage information is there, but I was still confused. The color photo of the cage installed in the interior lacks contrast, I mistook the exhausts for cage members, and I apparently had an extra crossbar anyway (guess I didn't really need that replacement after all) so I ended up asking Dave exactly where the five cross members go. Turns out there are only two, both at the back of the cage, with one high and one low. I've included a photo of my completed cage with this article so that you won't have any problems when you build yours. I built the roll cage in the interior but did not glue it to the interior. I then removed the cage from the interior, painted both, built up the interior, and then reinstalled the cage. Make sure you don't glue the seats too close to the doors or you will have trouble getting the cage side member past them. After the cage is installed, form and install the seat and shoulder harness. The shoulder straps wrap around the lower bar at the rear of the cage and the seatbelts snap into slots in the seat. I painted the harness after it was in place. The handle on my kit's hand brake had snapped off but was easily glued back on. The hand brake lever seems a bit long to me. The only interior photos I have are of the stock street car and it came with a foot operated parking break, so I can't tell if it's correct or not. Both the interior and body are to be painted Ford 1966 Rangoon Red. Tamiya TS-08 Italian Red spray paint is a very close match.
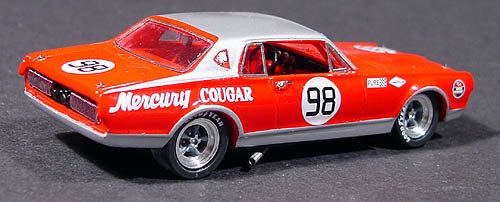
Decaling, fitting windows and finishing Now its time to apply decals to the body. The cars were painted bright read with a silver roof, rocker panels, and fender edges. All silver areas are supplied as decals. For the silver areas, follow the directions to start at the bottom and do the roof last. These decals are wonderful. Possibly the best decals I have ever worked with. The big roof decal lies almost completely flat by itself. Carefully smooth any bubbles out from the center to the edges. After working with it a while, only a couple of areas along the edges wouldn't lie down. I hit them with a little Micro Sol and they went right down. Just beautiful. If you need to touch up the decals because of a misfit or tear, the instructions recommend using Testor's Aluminum Plate Buffing Metalizer but I used Tamiya XF-16 Flat Aluminum and thought it matched perfectly. There are two complete roof decals include in case you mess up the first one.
I'm not sure that the roof decals are quite long enough. I lined it up with the front edge of the roof and it just reaches to the rear edge. It really needs to be inside the front window area also. This is not really a problem though as you can paint that area to match. There are two sets of plated headlights and one set of plated taillights included. One set of headlights is open and one closed. Do not mix up the closed headlights with the similarly shaped taillights. The headlights are longer and both ends of the headlights are straight while the taillights have one straight and one slightly curved edge. The curved ends point out towards the fenders. Both the head and taillights look like vertical-barred grills. The taillights should be painted clear red and then the paint wiped off the high spots so that the red is only in the crevices. The headlights on early season cars should also be painted the same way using flat black paint. Late season headlights are completely flat black. Leslie's car should have a screen over the front grill but I couldn't figure out a good way to glue it in place so I left it off. I can always go back later and add it. The pins on the exhausts that are used to locate them to the chassis plate are rather long, so after attaching them to the plate and letting the glue cure, trim the excess pin off flush with the plate. If you don't, they will interfere with the interior during final assembly.
Now we come to the windows, my one problem area with the kit. The instructions say to cut the windows out using the templates and then glue them in place. After that, glue the photoetched frames in place. This is the same for front, rear, side, and vent windows. I started with the front window and it just didn't work for me. It took three windshields to get it close to right. And I ended up installing the parts differently. I first glued the frame in place and then glued the window in from the inside. I also had to do this with the rear window but it only took two tries. I had never installed this type of window before so I'm sure much of the fault lies with me. But I feel there were two strikes against the kit parts also. The windshield template and photoetched frame are not wide enough. Once installed it looks OK, but if you look closely you can see tiny gaps on each side. This was not a problem with the other windows. The other problem may be that the "glass" is too thick. I measured it at .007 inches. The acetate supplied in a Rennaisance kit I have yet to build is only .003 inches think. Thinner plastic would help the frames not look like they were sticking out from the body.
(Note: The window glass thickness was brought to Microspsort's attention and future kits will contain .003 thick sheets. Microsport is also making this material available to dealers and customers who already have the kit.) Miscellaneous Comments The photos in Friedman's Trans-Am, The Pony Car Wars 1966-1972 show that Leslie's car had what appear to be lights to illuminate the door numbers just above and forward of the roundels. They were not included in the kit. I haven't figured out a way to replicate these yet. The kit instructions state that the driver's names only appeared above the left door, not above both doors as shown on the restored car. However, Friedman's book shows names on both sides at Sebring. This appears to be the only race where this was done, but if you deviate from the five cars listed in the instructions, have plenty of references available. You will have tons of left over decals when you are done. The kit even includes "Dan Gurney for President" bumper stickers. Several of the leftover decals will be SCCA tech inspection stickers. I'll let Microsport's Dave Ferguson explain why: " The decals were done early on in the project with my assuming that the Cougars actually ran them...this was a mistake born out of ignorance (and not a little arrogance!). Back then, the SCCA required that all cars display the stickers...but their tech inspectors apparently never enforced it! This realization came, of course, only after I had okayed the print run, THEN came into a nice batch of reference material....so those are extras....ditto the #16s (note that none of my versions in the kit ran that # - they're either #15 or #98. Only Gurney used #16 and that was at Sebring ' 67.) There will be extra tech inspection stickers, too...from my research on the CanAm decals, I knew what each track used at that time and went and printed them anyway, betting that photos would eventually surface that would show their exact location. For once (not the first
time!) I'm out of luck...no references have surfaced that show these...so an educated guess is If you look closely at many of the photos in Friedman's book, you will see small stickers in the lower corners of the windshield. Neither Dave Ferguson nor I know what they are, but they could be the tech inspection stickers. After starting the kit, I heard comments that some people thought it was smaller than 1/43 scale. I hadn't noticed anything odd as I also had a 1/87 scale kit on my bench being built at the time. Everything looked huge next to that car! But a quick check with a ruler against dimensions from the book Photofacts Mercury Cougar 1967-1973 confirmed that the kit is smaller than 1/43. My estimate is that it is 1/48th scale. Conclusion All in all, despite the minor problems, this is an excellent first kit from Microsport. Most of it assembles quite nicely, there are more written instructions than I've ever seen in model kit before, the resin is very well cast, the proportions look good, and the decals are world class. I know some modelers are scale freaks, but don't let the odd size put you off. If you are a Trans-Am fan, this is a must have kit of a short lived, yet significant racer from the early days of the series. I look forward to building future kits from Microsport.
|