|
Origin of the scale
The origins of 1/43 scale are the early dinky toys, which were originally produced as accessories for O gauge model railways which were popular at the time, this was a real "bastardisation" of a scale being 7 mm to 1 foot!
O gauge lost its popularity but by then Dinky was established and the scale stayed as the standard for diecast toys although for some strange reason most commercial vehicles were made in 1/50th.
One of the problems that has long faced model makers and collectors is that
the range of subjects has always been limited. Diecast and plastic kit manufactures are in the main large organisations that produce products at very reasonable prices. To do so they have to be subjects, which have a mass appeal otherwise sales, would not recover the expenses of masters and pattern making etc. Thus many of the subjects that appeal to enthusiasts are not modelled and thus the only option was to scratch build or "chop" an existing model.
|
The earliest white metal kits grew out of this desire for models not produced by the major manufactures. I can remember reading articles by Barry Lester in Model Boats and Cars magazine over forty years ago about "Chopping Miniatures". Barry went on to establish Auto Replicas, which continued until very recently. Many of the early kits were very crude and in many cases it might have been easier to start with a lump of metal however the early Auto Replicas were of a very high standard for the day and soon the rest had to catch up to survive. The early manufactures were first and foremost enthusiasts who worked from the back shed or kitchen table producing a few kits of each model for a small appreciative clientele and this is still the case today. One of my suppliers in Italy has neither Phone nor Fax in his workshop, Fax's are sent to a tobacconist
where he buys tobacco once a week!
The title of this piece perhaps sounds a little warning, you have decided after reading all the articles to have a go yourself. First the warnings in the title, you will probably use your credit card because, you will almost certainly be buying your kit by mail order and these kits are more expensive than the average plastic kit. The fools rush in, your heart may rule your head, you are probably buying something which you have not seen the box let alone the contents from someone you do not know and who does not know you or your experience and skill level and worse still may not care!
Sadly all to often I have had panic telephone calls or e-mails from people who have bought a kit which when it arrived has left them scratching their heads wondering where to start.
|
Often there is a disapproving other half saying I told you so and the place of purchase having made the sale is no longer interested. All to often this first purchase turns out to be say a Tameo modern F1 or worse still a superkit, nothing at all wrong with the kits but not for a first timer.
The majority of people buying a first kit have built plastic kits at some time in their lives but resin and white metal involve some basic changes in practice. For a start, plastic is soft, melts and is not awfully forgiving. Resin and metal are stable and very forgiving, they do not melt under the influence of paint or glue and are resistant to most solvents. Hey this sounds good but, if it does not melt how do I glue it together, if it is resistant to solvents what paints stick to it and help I have just seen all those tiny metal photo-etch bits, how do I hold them, fix them, paint them, oh help me please!
I bought my first plastic kit as a small boy, I bought it at a shop where the shopkeeper served me and saw my age and guessed from my limited financial means that this was probably the first or almost first purchase. He ensured it was simple, and cheap enough for me to have all the glue and paint I might need. Only later did I advance to the high detail expensive kits. The majority of my customers buy with a credit card and by e-mail, unless they tell me I have no idea whether they have built a similar kit before. We try to look for signs and often ask if they have experience but if you do not tell the retailer it is very difficult to prevent that sick panic you will almost certainly feel when you see all those little bits.
|
|
So you have read so far so what do you buy for that first kit and why? Consider first for a few moments these factors
|
 It is probably smaller than any kit you have built before. It is probably smaller than any kit you have built before.
It is made from materials you have never used before.
You will thus need to adapt your technique to new paints, new adhesives and fillers, new ways of handling pieces, new tools to prepare parts.
You will be painting small parts with compound curves and deep holes and you will be applying decals to these same complex often deeply double curvature surfaces. So as when I bought my first simple plastic kit keep it simple, as a retailer I would far rather a first time customer bought a very simple kit and came back to me and said that was too easy what next, than they bought a Tameo superkit, ended up throwing it against the wall and questioning my parenthood. The first will probably be hooked and a regular customer and some time down the line build several Tameo kits, the second will probably not come back and miss out on a wonderful hobby.
I have chosen two kits from my collection for this article to demonstrate the basic thoughts that should go into your first choice. Both are Le Mans sportscars from the fifties early sixties. The Gordini is a resin kit from Provence Moulage that is now deleted but it is typical of the cars of the period. The Panhard is a painted kit from JPS, painted applies to the main body colour only but if the thought of painting worries you then this is a good start. Being sportscars there is no exposed complicated suspension to build, they are also both simple shapes with no awkward areas to spray. There are a limited number of simple decals to apply to areas which are flat or have a single curvature. There are very few small photo-etch pieces to learn to handle. There is a full photo build up of each subject with captions on the pictures taking you through each stage.
Below are a few basic instructions to go alongside these pictures and we hope that you will now be encouraged to use your credit card with care!
|
Basic instructions for building resin or white metal kits
|
Fears
Many people are frightened by the thought of resin or white metal kits
and yet they will happily build plastic kits. In general resin/white
metal kits are less problems because.
You can strip the paint and start again with cellulose thinners don't
leave it soaking too long
You bond not weld with the adhesive so most parts will separate without
damage if you use the right adhesives. In most cases you can undo your
mistakes.
|
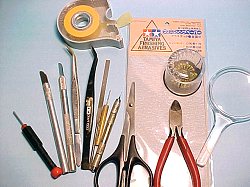
Tools
Very few tools are needed, the following are useful; needle files, a
sharp scalpel or modelling knife, 1:1200 wet and dry paper, a pair of
small sharp scissors, a pair of tweezers, some cocktail sticks and a
selection of small paint brushes.
|

|
Precautions
It is important that care and common-sense are used when handling resin,
white metal, paint and adhesives. Care should be taken to avoid inhaling
the dust particles from resin, white metal and paint. Always work in a
clean dust free area and clean up after dusty tasks. Where possible sand
resin and white metal wet and wash hands afterwards. AVOID SMOKING when
resin dust is in the air. In ideal circumstance an extraction system
should be used for all "dusty" processes.
|
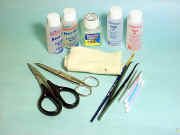
Paint and glue
I use car touch up spray cans for my models, I like the HALFORDS range,
it is important to use the Primer for plastic on resin kits. A selection
of cans of model paint for small parts, Humbrol or similar.
For glue I use; 5minute epoxy, Dunlop Thixofix, clear PVA (WOODWORK
GLUE) and super glue. Super glue must be used with extreme care as it
can damage paintwork and fingers.
|

|
1) Open the box carefully, as there may be small pieces which have come
out of the packaging in the post. Some times sprues of photoetche parts
are selotaped to the inside of the box lid. Identify all the parts, I
like to put all but the main parts into a separate sealable container until they are needed, study the instructions which may consist of
little more than a picture. If any parts are missing please contact your retailer
immediately as the model run is often short and it may be impossible to
get replacement parts later.
|
2) Clean up any mould lines on the cast resin or metal bits with files
and wet &dry paper, check for any voids or other surface porosity, this
can be filled with plastic padding type fillers.
|

|
|
3) When satisfied with part preparation they should be carefully cleaned,
With white metal I use very fine wire wool first and then I clean both resin
And white metal kits with an old toothbrush and a mixture of washing up
liquid and Jiff.
Once clean avoid touching surfaces to be painted, I try to hold parts
with paper towel.
|

|
I find that the resin used by Tenariv and ESDO takes paint much better
if it is given a quick wash in cellulose thinner. I use thinners to strip any
paint failures, but it must be done quickly, again the old toothbrush is
ideal for this.
|
WORK QUICKLY AND DON'T LEAVE RESIN PARTS
TO SOAK .
|
|
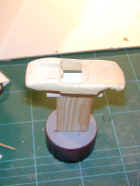
4) Mount parts to be spray painted on a suitable stand that can be held
and rotated while spraying. Ensure parts are completely dry and spray
with a thin coat of primer. Check for any surface imperfections, if
happy spray a second coat. Allow about 24 hours for primer to dry before
spraying topcoat. I use one mist coat followed by one thick coat about 60 seconds later but I have had years
of practice so it may be better to use several thin coats rather than one thick coat allowing time to dry
between each coat. Check for dust before each coat.
|
|
When I am happy with the paint finish I like to put the model away for 7
days to allow the paint to harden. I then finish the paint with a gentle
polish with a fine cutting polish.
Read more about building a simple painting stand > Here
5) While sprayed parts are drying the other parts can be trimmed cleaned
and hand painted.
Read more about painting > Here
6) Assembly; As instructions are often very poor trial fit as many parts
as possible before the use of adhesive, Thixofix and PVA take longer to
set but you can pull them apart if you have made a
mistake, The "window
" section will often go in one piece, usually from the inside after
trimming excess material, repeated trial and error is advised, do not
over trim. Generally construction presents few problems as long as it is
taken slowly with as many dry fits as possible. Make sure any transfers
for the interior are added before the base plate is fixed.
7) Transfers; On many of today's race car models the transfers are
extensive. Again care and patience are vital, try to see where each
decal is placed, I try to do one side of the car then leave these to set
then do the other side and lastly the upper surfaces, if to much is
attempted at once it is easy to displace transfers that are not yet set.
With complicated shapes a good decal softener is a great help, I divide
up the sheet into small sections and place each section on a damp sponge
when I am ready to start that section.
|
8) Decal softener; it is a good idea to practice before you start
applying decals to your model, most model shops sell either sheets of
plain decal or large decals for flying models. Cut up the decals into
odd shapes and sizes and the find an old say jam jar, you will find a
nice piece of double curvature on the base and often there are numbers
and other interesting shapes on the base or lid.
|
|
I use a small very
soft paintbrush which I reserve for use with decal softener, put a small
drop of softener where you want to place the decal and put the decal
over the top, the softener will spread between the decal and the surface
and the decal will soften and adapt to the surface. If the surface is
very complicated it may be required to brush further softener onto the
surface of the decal. It may take several applications and considerable
time, it can even be left and continued next day so have patience and
don't be tempted to force the decal as they are very fragile and may
split. Decal softener also stops decals lifting with age and can be used
to re-adhere old decals.
Read more about applying decals > Here
Part II > Click here
|